
Provisioning Token2 TOTP programmable tokens - a universal guide
Will it work at all?
Before even starting to read this guide, you need to be sure the system supports TOTP as the secondary authentication factor. Some systems clearly mention it, in some others this is explained in a rather cryptic manner. So, our recommendation in this case is to simply check (or ask) if you can enable multifactor authentication using Google Authenticator. If Google Authenticator works, then our programmable tokens will work as well (because our tokens are designed to work as drop-in replacement for TOTP mobile apps).
But even if Google Authenticator is not declared as supported, the service may still be using TOTP, but using their own app. If this is still unclear, we recommend contacting us and providing the details, so we can help you find the best solution.
TOTP algorithm
TOTP, or Time-Based One-Time Password, is a type of authentication method that uses a combination of a secret key and a time-based moving factor to generate a one-time password. The TOTP algorithm uses the current time and the secret key to generate a unique password that is only valid for a short period of time. To use TOTP, the user first needs to have a secret key that is shared between the user and the service they are trying to access. This key is typically provided by the service in the form of a QR code that can be scanned by the user's TOTP app or transferred to a programmable token. Once the user has the secret key, they can use their TOTP app (or programmable token) to generate a one-time password by using the key and the current time. The app will then generate a unique password that can be used to log in to the service. The advantage of TOTP is that it provides an additional layer of security by requiring a unique one time password that can only be used once and only for a short period of time. This makes it difficult for attackers to reuse stolen passwords, as they would need to have both the secret key and the exact time the password was generated in order to use it.
As all the arguments used by this function are the same for both the authentication server and the client authenticator, the OTP generated by both sides are expected to be the same. The table below gives an overview of all the parameters used to calculate an OTP :
|
Parameter |
Description |
|
SHARED_SECRET |
A unique value in the form of a hexadecimal string stored on both the server and the client side |
|
SHA_ALGORITM |
The algorithm can use different types of SHA hashes together with HMAC, but it is important to have this specified on both sides. It can be sha1, sha256 or even sha512 (please note that sha512 is quite rarely used and currently not supported by our hardware and software) |
|
UNIX_TIMESTAMP |
The Unix timestamp - the number of seconds (excluding leap seconds) since January 1st, 1970. It is important that the server and the client system have this value the same, therefore having the system time correct on both sides is crucial. Check the time drift section below for more information about this aspect. |
|
INTERVAL |
The time period during which an OTP remains active. Usually 30 or 60 seconds (but RFC does not limit this parameter, so this can theoretically be of any value) |
|
DIGITS |
The number of digits extracted from the calculated hmac output. RFC allows any number, but most implementations have 6 or 8 digits. |
The algorithm is using all the arguments listed above and looks like below:
truncate( hmac (SHA_ALGORITHM(SHARED_SECRET, round(UNIX_TIMESTAMP / INTERVAL) ) )) mod 10**DIGITSThe RFC for TOTP is dated 2011, but its production use commenced even before, in 2010, when Google started their 2FA implementation. Google Authenticator was the first (and remains the most popular even nowadays ) mobile application based on TOTP. Google Authenticator was hard-coded to use sha1 hashes, 6 digits OTP and 30 seconds for the time offset. For this reason, this combination is the most widely used one and is informally considered as the default industry standard. Quite a lot of systems even use this as a replacement term of TOTP (i.e. 2FA with Google Authenticator instead of just TOTP).
TOTP registration/enrollment process
As already mentioned, the main principle of TOTP is having all the parameters on the server to be the same on the client side as well, so the main requirement for provisioning a TOTP client is to transfer these arguments, in most of the cases generated on the server side and to be copied to the client application or device. Some systems allow administrators or even users to specify these parameters on the server directly. In such cases, there is no client provisioning needed as such, and therefore no need to use programmable tokens at all and cheaper classic tokens can be used instead.
Most systems implemented the TOTP registration by showing a special QR code containing all the parameters. As TOTP clients are mostly mobile applications and run on smartphones equipped with cameras, transferring this data via scanning a QR image is the most convenient way. There is no RFC nor any other commonly accepted document defining the format of such QR images, but as a de facto standard the following format, originally published by Google as a part of the Google Authenticator project, is used:
otpauth://totp/ACME%20Co:[email protected]?secret=HXDMVJECJJWSRB3HWIZR4IFUGFTMXBOZ&issuer=ACME%20Co&algorithm=SHA1&digits=6&period=30 While this format is not ideal, this appears to be the only standard and is covering the main parameters used to calculate the OTPs. In practice, only secret is mandatory, for other parameters, if not provided, defaults can be assumed such as : SHA1 algorithm, 6 digits and 30 seconds interval. Other parameters, like the issuer and the account name are not used for OTP calculation itself, but are used to identify and distinguish the accounts in case you have more than one TOTP on your authenticator (this may be useful for the ones capable of holding multiple accounts, such as mobile apps or multi-profile hardware tokens).
In a nutshell, the step where the system shows you a QR code and prompts to scan it using Google Authenticator or a similar app, is the phase where you need to use one of our hardware token provisioning tools (an NFC Burner app, a USB config tool or a Python script). If your device supports scanning the QR code (using its camera, where available, or read it from the screenshot), the image of the QR code is enough for you to continue with.
If your device or tool does not allow scanning the QR, you need to obtain the secret (and theoretically other parameters) in text format. You can do it by decoding the image containing the QR code, but many systems also have the option of showing this text on the enrollment page, as shown on an example below.
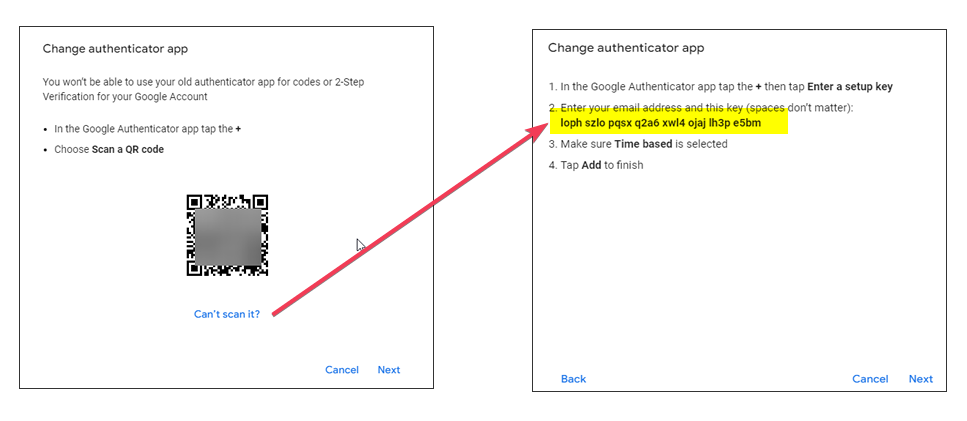
In this example (which is taken from Google Account 2FA configuration), clicking on "Can't scan it?" link, will show the secret only in base32 format. You can copy and paste it into your Token2 provisioning tool. Important: although the spaces do not matter for Google Authenticator, some of the Token2 apps may not accept it. Also, secrets need to be converted to upper case (most of Token2 apps remove spaces and convert to upper case automatically).
Let's burn it!
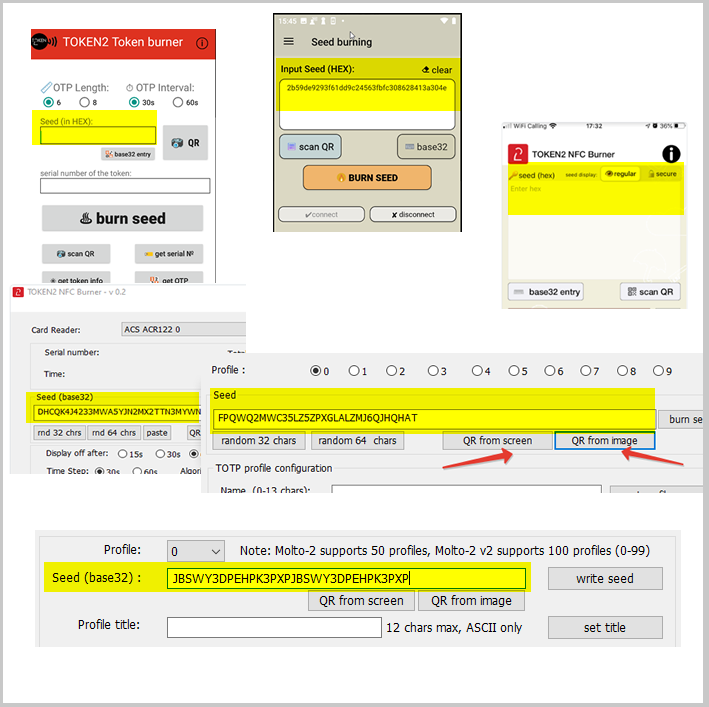
We call the process of writing the secret key and the configuration to the programmable token's memory chip burning. Therefore, you will see this word used in our documentation and the tools (i.e. the apps for NFC programmable tokens are called NFC Burner and so on).
Before you can write the secret itself, you need to make sure the configuration has also been set correctly (this step is recommended to be done before writing the seed itself). For newly purchased tokens, this step is optional if default configuration is used (sha1, 30 seconds, 6 digits) as they come pre-configured. For other cases (and as well for additional profiles of multiprofile programmable tokens) this has to be done as well.
Important: when checking and setting time of the tokens, make sure you use UTC as the time zone (and not your local time).
Once you have successfully retrieved the shared secret from the authentication system, you need to enter it (or paste it) to the seed input field of the application you use for provisioning. Please note that some apps use hex format for the seed, in those cases, there is always a button to convert from base32.
Finalizing the enrollment
Once the configuration and the seed was successfully written to the hardware token, you need to confirm the process by entering the 6 (or 8, or 10..) digit code generated by the hardware token to the 2FA page. The system will make sure the OTP generated is correct and complete the enrollment.
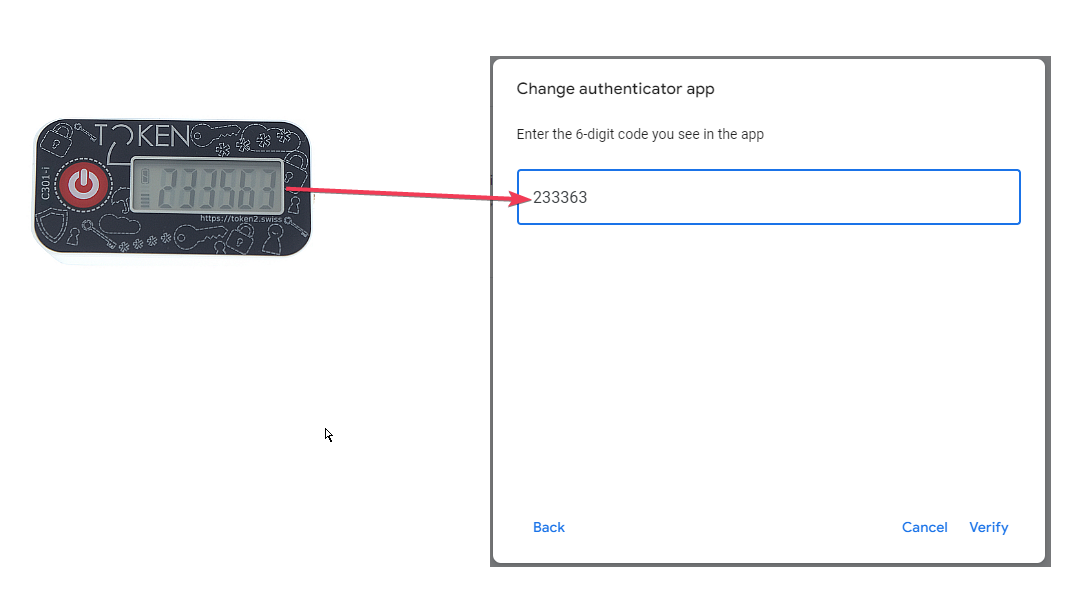
From this point forward, only the hardware token is required to be used for the authentication - no need to have the NFC Burner or USB config app nor the device that was used to run the app. All subsequent logins will be done using the hardware token itself.
It is not working!
In an ideal situation, the provisioning process is simple and quick and should not cause any issues, but we have received support requests about the provisioning from some of the customers and thought that summarizing them here would be useful. This table does not include NFC-related issues, check this page for more information about addressing problems with NFC.
| # | Problem, symptom | Description and solution |
| 1 | The OTP code is generated on the hardware token, but not accepted by the enrollment page | One of the reasons is the clock set on the hardware token. In some rare cases, it may have a significant drift, in some cases it is wrongly set by the users themselves. Please check and/or set the system time on the hardware token using the configuration part of the provisioning tool. Important to mention: the time on the token has to be in UTC, not your local time zone. |
| 2 | The OTP code is generated on the hardware token, but not accepted by the enrollment page, and I made sure the time is correct (so this is not the problem #1) | Make sure other configuration of the profile is correct. We have seen clients setting the hash type for Google Account as SHA256 because they thought that "SHA256 is more secure than SHA1". While this may or may not be true, it is not up to the end user to decide, the authenthicator has to be set using exactly the same parameters as set on the server. It cannot be changed only on the client, these parameters have to match on both sides. A similar case was reported when the client has set the interval to be 60 seconds instead of 30 seconds ("because 30 seconds is not enough"). In some cases, you need to apply the correct configuration before writing the seed, even if you use default settings - this may solve the issue when the configuration was previously incorrectly applied, or no configuration exists at all (this is the case with additional profiles of multiprofile tokens : only profile #0 is pre-configured) |
| 3 | The token shows dashes ("------") instead of the digits. | Dashes indicate that no seed exists. On some models of the tokens (i.e. the ones with restricted time sync) changing the configuration automatically clears the stored seed for security puposes. To avoid this, make sure you write the configuration before writing the seed. If you have a requirement to change the time without clearing the seed, you should be using the tokens with unrestricted time sync. |
Subscribe to our mailing list
Want to keep up-to-date with the latest Token2 news, projects and events? Join our mailing list!