Token2 NFC Burner User Guide
Last updated 2026-11-16
Version 0.3.0
Token2 NFC Burner writes seeds, settings and the clock into Token2 single-profile programmable TOTP tokens over NFC, one token at a time or a whole batch in a row. Version 0.3.0 runs on Windows, macOS and Linux and comes with a desktop app and a command-line tool.
Looking for the previous Windows-only release? The NFC Burner for Windows v0.2 guide is still available.
Download and install
| System | Download | How to start |
|---|---|---|
| Windows 10 and 11, 64-bit | NFC-Burner-0.3.0-windows-x64.zip | Portable, nothing to install. Extract the zip and double-click NFC Burner.exe. nfcburner.exe in the same folder is the command-line tool. |
| macOS 11 or later (Apple silicon and Intel) | Token2-NFC-Burner-macOS-0.3.0.dmg | Open the DMG and drag Token2 NFC Burner to Applications. The command-line tool is inside the app: /Applications/Token2 NFC Burner.app/Contents/MacOS/nfcburner. |
| Linux x86_64: Debian 12+, Ubuntu 22.04+, Linux Mint 21+, Fedora 36+ (including Silverblue and Kinoite) | Token2-NFC-Burner-linux-x86_64.0.3.0.zip | Make the file executable and run it (see below). No installation and no FUSE 2 needed. |
You also need an NFC (contactless) reader. We recommend Token2's own readers:
- Desktop: Token2 Dual Reader — USB-A and USB-C, NFC and smart card (NFCUSBT2).
- Compact: Token2 Compact Dual Reader — USB, NFC and smart card (T2SR).
The app uses the system's standard smart card service (PC/SC), so the reader needs no extra driver on Windows and macOS.
Linux
Install and start the smart card service once. An AppImage can't do this for you:
sudo apt install pcscd                     # Debian, Ubuntu, Mint
sudo dnf install pcsc-lite                 # Fedora (rpm-ostree install pcsc-lite on Silverblue)
sudo systemctl enable --now pcscd.socket
Then run the app:
chmod +x Token2-NFC-Burner-0.3.0-x86_64.AppImage
./Token2-NFC-Burner-0.3.0-x86_64.AppImage                 # desktop app
./Token2-NFC-Burner-0.3.0-x86_64.AppImage --cli info      # command-line tool
To call the command-line tool by name, link it: ln -s Token2-NFC-Burner-0.3.0-x86_64.AppImage nfcburner, then ./nfcburner info.
Linux: reader not detected
On Linux, the smart card service (pcscd) uses the CCID driver, which only accepts readers whose USB vendor and product IDs are on its built-in list. The Token2 NFC reader (USB ID 349E:0430) is a standard CCID reader, but it is not yet on the list shipped by most distributions. pcscd then ignores it: the reader is plugged in and powered, but the app reports that no reader was found. Windows uses a generic driver for any CCID reader, so this step is not needed there.
The script below installs pcscd and the CCID driver, adds the Token2 reader to the driver's list (after saving a backup of the original file), and restarts pcscd. Save it as token2-reader-setup.sh and run sh token2-reader-setup.sh, then unplug and reconnect the reader.
#!/bin/sh
# Register the Token2 NFC reader (USB 349E:0430) with the PC/SC CCID driver.
# Re-run after a CCID driver update: the update replaces Info.plist.
set -e

if command -v apt-get >/dev/null; then
    sudo apt-get install -y pcscd libccid
elif command -v dnf >/dev/null; then
    sudo dnf install -y pcsc-lite pcsc-lite-ccid
fi

PLIST=$(find /usr/lib /usr/lib64 -path '*/pcsc/drivers/ifd-ccid.bundle/Contents/Info.plist' -print -quit 2>/dev/null)
[ -n "$PLIST" ] || { echo "CCID driver not found."; exit 1; }

if grep -q 'Token2 MFA NFC Reader' "$PLIST"; then
    echo "Token2 reader already registered."
else
    [ -e "$PLIST.backup" ] || sudo cp "$PLIST" "$PLIST.backup"
    # Append one entry to the end of each of the three parallel lists.
    sudo sed -i \
        -e '/<key>ifdVendorID<\/key>/,/<\/array>/ s|</array>|\t<string>0x349E</string>\n\t</array>|' \
        -e '/<key>ifdProductID<\/key>/,/<\/array>/ s|</array>|\t<string>0x0430</string>\n\t</array>|' \
        -e '/<key>ifdFriendlyName<\/key>/,/<\/array>/ s|</array>|\t<string>Token2 MFA NFC Reader</string>\n\t</array>|' \
        "$PLIST"
    echo "Token2 reader registered."
fi

sudo systemctl enable pcscd.socket
sudo systemctl restart pcscd.socket pcscd.service
echo "Done. Unplug and reconnect the reader."
The change is made to a file that belongs to the CCID driver, so a driver update replaces it. If the reader disappears after a system update, run the script again. On Fedora Silverblue and Kinoite, the system files are read-only and the script cannot make this change.
Windows
The app uses Microsoft Edge WebView2, which is built into Windows 11 and present on most Windows 10 PCs. If the window does not open, install the Evergreen WebView2 runtime from Microsoft.
Supported tokens
The app recognises the model from the first seven digits of the serial number. Any other card on the reader is shown with its serial and never programmed.
| Model | Serial starts with | Form | Time sync |
|---|---|---|---|
| OTPC-P1-i | 8659612 | card | unrestricted |
| OTPC-P2-i | 8659622 | card | restricted |
| OTPC-P2-i-NB | 8659621 | card, non-branded | restricted |
| miniOTP-2-i | 8659600 | mini card | unrestricted |
| miniOTP-3-i | 8659601 | mini card | restricted |
| miniOTP-3-i-NB | 8659609 | mini card, non-branded | restricted |
| C301-i | 8659610 | key fob | restricted |
| C302-i | 8659632 | key fob | unrestricted |
All of them show 6-digit codes and support:
- HMAC algorithm SHA1 (default) or SHA256.
- Time step 30 s (default) or 60 s.
- Display turns off after 15, 30 (default), 60 or 120 seconds.
- Seeds of up to 63 bytes. Shorter seeds are padded with zeros to 20 bytes, as in earlier versions.
What "restricted time sync" means for you is explained in its own section.
Before you start
- Connect the reader and start the app. The status pill at the top shows No card on reader.
- Switch the token on: press its button until the display shows digits or dashes. A token that is off does not answer over NFC.
- Lay the token flat on the reader and keep it there until the app reports the result. The app reads the token by itself; Read token reads it again on demand.
The token's seed can't be read back. Register every seed with your authentication server, or keep it in an export file, before you burn the next token.
The main window
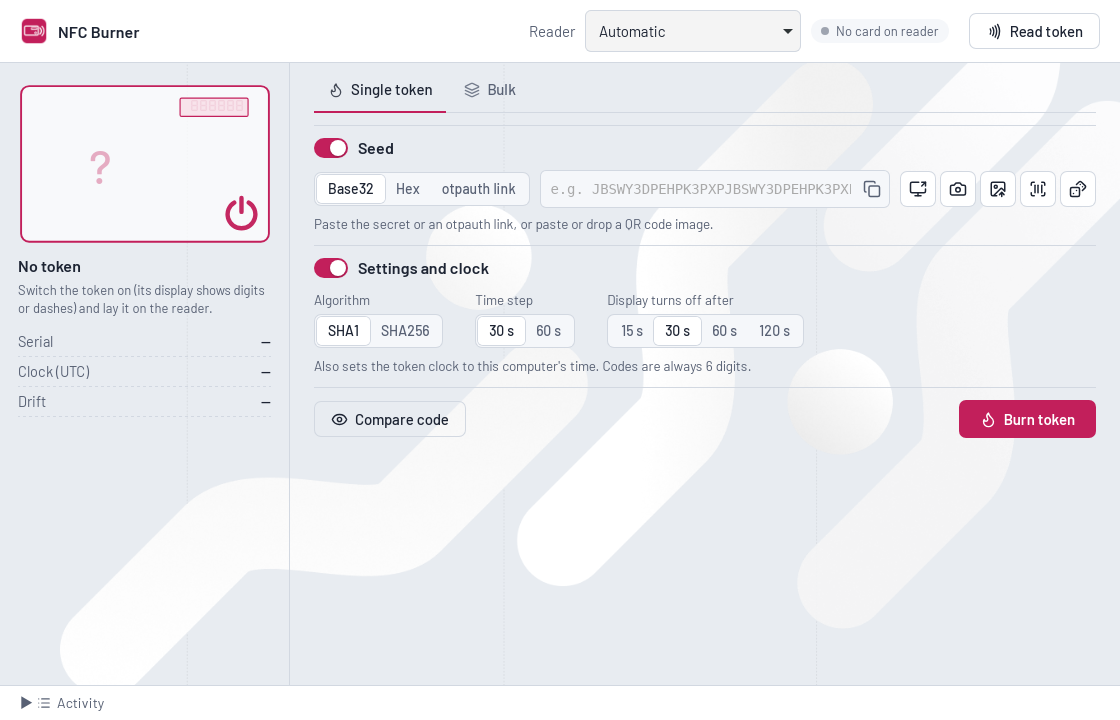
- Top bar: the reader (Automatic picks the reader a token is placed on), whether a card is detected, and Read token.
- Side panel: an outline of the detected model, whether its time sync is restricted, the serial number, the token's clock (UTC) and its drift from this computer's clock. After a burn, the outline shows the code the token should display now.
- Single token and Bulk tabs: see the next sections.
- Activity at the bottom: a log of every read and write, with times. Open it when something does not work as expected.
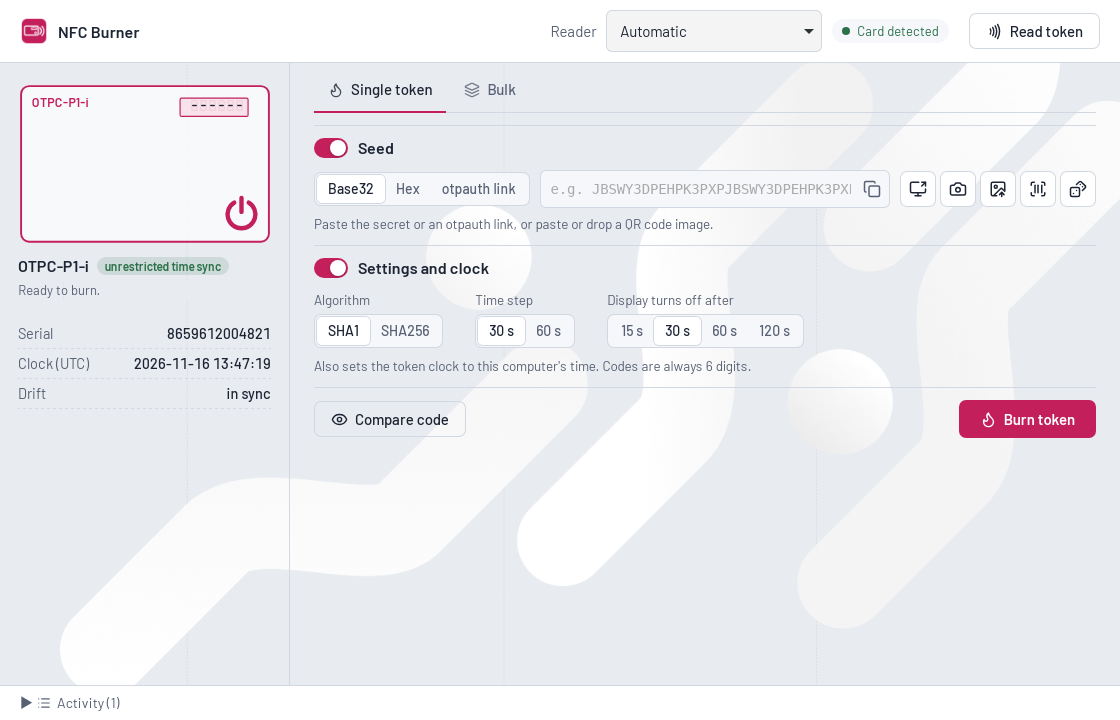
When you take the token away, the values stay on screen for 20 seconds and are then cleared, so a seed does not stay visible on an unattended computer.
Burn a single token
1. Enter the seed
Keep Seed on and choose how you give it:
- Base32: the secret as most enrolment pages show it, for example
JBSWY3DPEHPK3PXP. Spaces are ignored. - Hex: the secret in hexadecimal, up to 63 bytes.
- otpauth link: an
otpauth://totp/…link. The app also takes the algorithm and time step from it and shows what it read under the field.
The buttons on the right of the field fill it for you:
| Button | What it does |
|---|---|
| Scan screen | Finds a QR code shown anywhere on your screen, for example on the enrolment page in your browser. On Linux with Wayland, the desktop may ask you once to allow screenshots. |
| Camera | Reads a QR code held in front of the computer's camera. macOS asks for camera access the first time. |
| Image file | Reads a QR code from a saved picture (PNG, JPEG and similar). |
| 2D barcode scanner | Puts the cursor in the field so a USB 2D barcode scanner can type the QR code's content into it. |
| Random seed | Creates a new seed from the system's secure random generator: 20 bytes for SHA1, 32 bytes for SHA256. |
You can also paste a QR image from the clipboard, or drop an image file on the window. The copy icon inside the field copies the seed.
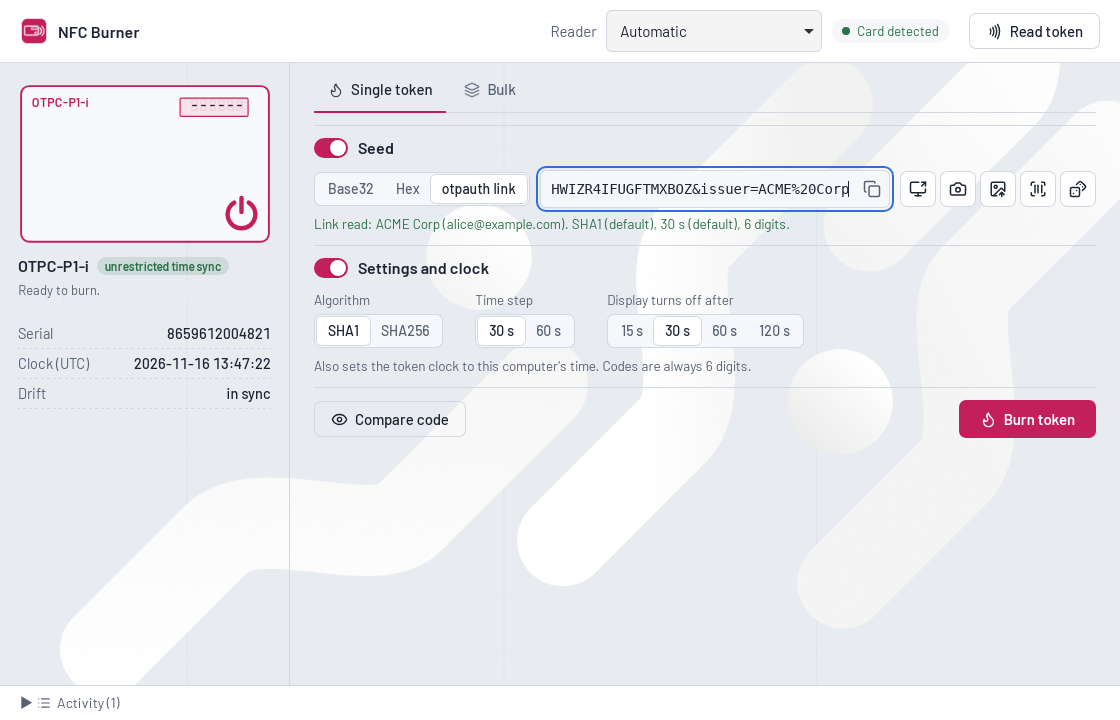
- An export QR code that holds several accounts lets you choose the account to burn.
- Accounts with 8-digit codes are refused, because the tokens show 6 digits.
2. Check the settings
With Settings and clock on, the app writes the algorithm, time step and display timeout, and sets the token's clock to this computer's time, before it writes the seed. Make sure the computer's clock is correct. Turn Settings and clock off to write only the seed and keep the token's current settings and clock.
3. Burn and compare
Choose Burn token. When it is done, the outline in the side panel shows the code the token should display now.
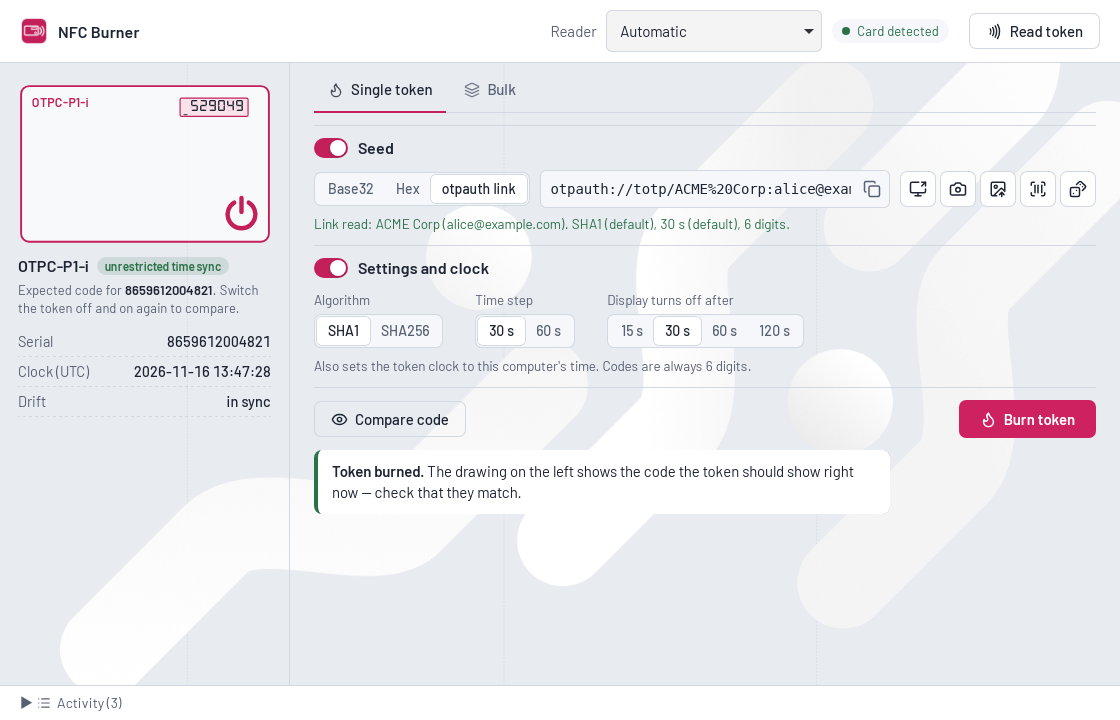
Switch the token off and on again to compare: the code on its display must match the one on screen. Compare code shows the current code for the seed in the field at any time, even with no token on the reader.
Restricted time sync
Every model accepts a new seed at any time. The difference is in the settings:
- Unrestricted models (OTPC-P1-i, miniOTP-2-i, C302-i) keep their seed when you write new settings or set the clock again.
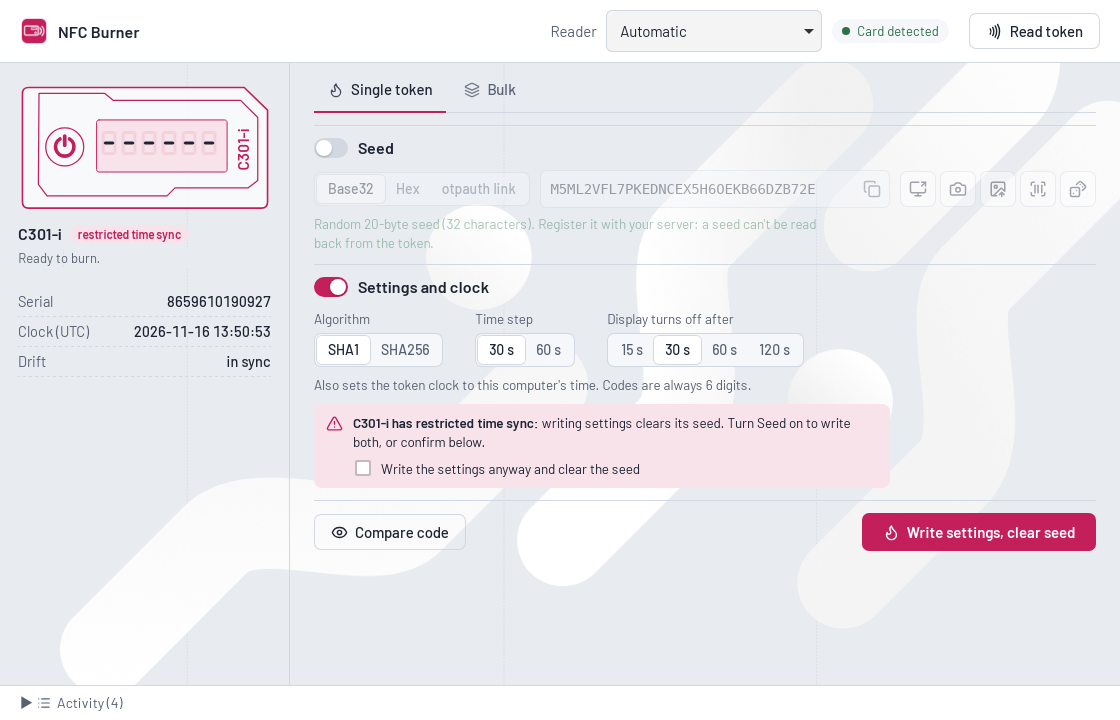
- Restricted models (OTPC-P2-i, OTPC-P2-i-NB, miniOTP-3-i, miniOTP-3-i-NB, C301-i) clear their seed whenever settings are written, and writing settings always sets the clock. So the clock can only be set together with a new seed.
The app handles this for you. With both Seed and Settings and clock on, it writes the settings first and the seed second, so the token ends up with both. If you turn Seed off on a restricted model, the app warns you and the burn button changes to Write settings, clear seed. It only works after you tick Write the settings anyway and clear the seed.
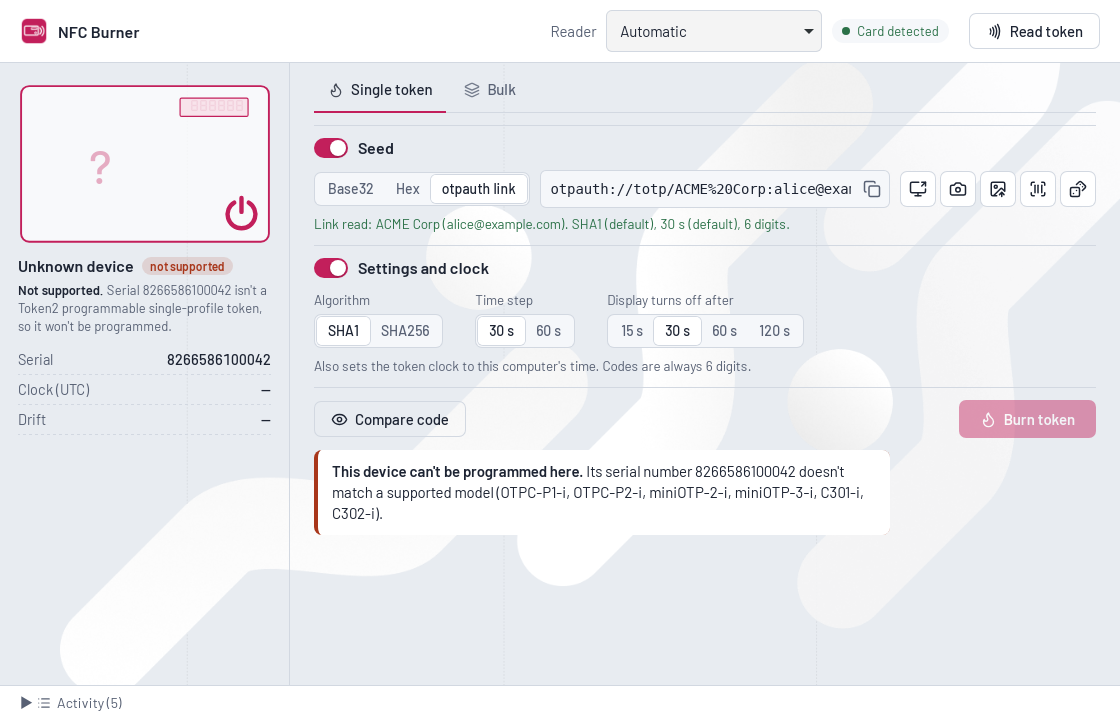
A device that is not one of the supported models is shown as Unknown device and the burn button stays disabled.
Bulk mode
Bulk mode burns a series of tokens one after another and saves each one to an export file you can import into your authentication server.
- Open the Bulk tab.
- Choose the seed:
- Random seed for each token on (the usual case): every token gets its own new seed. An export file is required, because these seeds exist nowhere else.
- Off: every token gets the seed entered on the Single token tab.
- Keep Apply settings and clock on to write the settings from the Single token tab and set each token's clock. Turn it off to write seeds only.
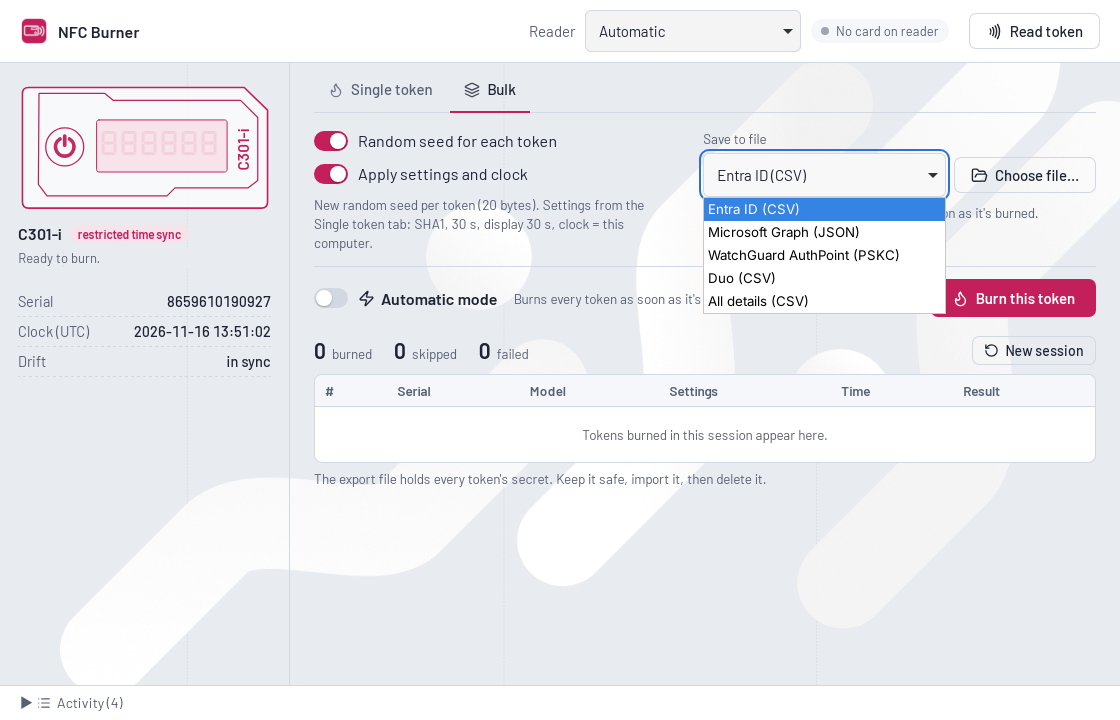
- Under Save to file, choose the export format, then Choose file…. Choosing an existing file adds the new tokens to it.
- Turn on Automatic mode. Place the tokens one at a time, each switched on, and take each one away once it is listed. Without automatic mode, place a token and choose Burn this token.
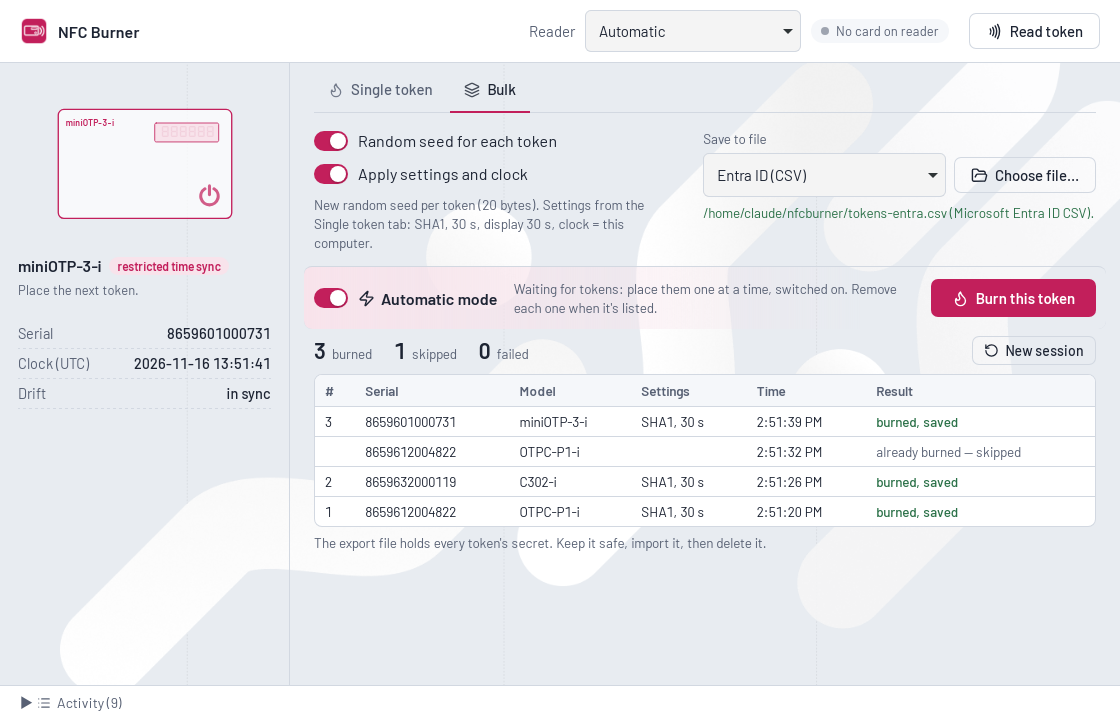
- A token placed twice in the same session is skipped, so it can't get a second seed by accident.
- Each token is written to the export file right after it is burned, so nothing is lost if the computer stops halfway.
- The counters show burned, skipped and failed tokens. New session clears the list and the duplicate check.
- A failed token (moved too early, switched off) can simply be placed again.
Export formats
| Format | File | Content and how to use it |
|---|---|---|
| Entra ID (CSV) | .csv | upn,serial number,secret key,time interval,manufacturer,model. Fill in the upn column with each user's sign-in name before uploading it to Microsoft Entra ID (hardware OATH tokens). This upload accepts SHA1 tokens only. |
| Microsoft Graph (JSON) | .json | A request body that creates all tokens in one call: POST https://graph.microsoft.com/beta/directory/authenticationMethodDevices/hardwareOathDevices. Supports SHA1 and SHA256. You can add assignTo to each token to assign it to a user in the same call. Needs the Policy.ReadWrite.AuthenticationMethod permission. |
| WatchGuard AuthPoint (PSKC) | .xml + .bin | An encrypted seed file in the same layout as the seed files Token2 supplies for AuthPoint, plus its key in a .bin file with the same name. In AuthPoint, import the .xml as the seed file and upload the .bin as the key file. |
| Duo (CSV) | .csv | One line per token: serial,HEXSECRET, no header. |
| All details (CSV) | .csv | Serial, model, seed in Base32 and hex, algorithm, time step, digits and burn time (UTC). Useful for your own records or other servers. |
The export file holds every token's secret. Keep it somewhere safe, import it, then delete it. For AuthPoint, send the .xml and the .bin separately: the seeds can only be read with both.
Recommendations
- Check that the computer's clock is correct before setting token clocks. The drift in the side panel shows how far a token's clock is from it.
- Prefer random seeds. A seed you generate yourself never passes through anyone else's hands.
- After a burn, switch the token off and on again and compare the code before you hand it out.
- Use SHA256 only if your authentication server supports it for hardware tokens. The Entra ID CSV upload does not; use the Microsoft Graph format instead.
- On restricted models, keep both Seed and Settings and clock on, so a new clock always comes with a new seed.
- Label tokens by serial number. Every export format identifies tokens by serial number.
Troubleshooting
| Problem | What to do |
|---|---|
| No reader in the list, or "No PC/SC readers found" | Reconnect the reader. On Windows, check that the Smart Card service is running. On Linux, install and start pcscd (see Download and install). |
| The reader is found, but the token is not detected | Switch the token on: its display must show digits or dashes. Lay it flat in the middle of the reader and keep it still. |
| "Unknown device" / "not supported" | The card is not one of the supported models. Multi-profile tokens such as Molto1 have their own configurator. |
| The code on the token doesn't match | Check the computer's clock and the time step (30 or 60 s) and algorithm your server expects. Switch the token off and on again to compare. If the seed came from a link or QR code, check the line under the seed field. |
| The token lost its seed after writing settings | It is a restricted model: settings always clear its seed. Burn it again with both Seed and Settings and clock on. |
| A QR code or link is refused with "needs 8-digit codes" | The tokens show 6 digits. Create the account on your server with 6-digit codes. |
| A burn failed halfway | The token was moved or switched off too early. Place it again and burn it again; in bulk mode, just place it again. |
| Screen scan finds no QR code | Make the QR code larger on screen and keep it fully visible. On Linux with Wayland, allow the screenshot when the desktop asks. |
| Linux: empty or black window | The AppImage already turns off WebKit's DMABUF renderer and compositing for known graphics problems. If you changed these, start it without WEBKIT_DISABLE_DMABUF_RENDERER and WEBKIT_DISABLE_COMPOSITING_MODE set. |
| macOS: "cannot be opened" or "unidentified developer" | Control-click the app, choose Open, then confirm. |
The Activity log at the bottom of the window shows each step and the token's answers. Include it when you contact support.
Command line
nfcburner (nfcburner.exe on Windows) does everything the app does, for scripts and automation.
nfcburner readers                                   # list readers, ● = card present
nfcburner info                                      # model, serial, clock, drift
nfcburner burn -b JBSWY3DPEHPK3PXPJBSWY3DPEHPK3PXP  # settings (defaults) + clock + seed
nfcburner burn -u "otpauth://totp/ACME:alice?secret=...&algorithm=SHA256&period=60"
nfcburner burn --qr enrolment.png [--qr-pick 2]
nfcburner burn --random-seed --algo sha256 --sleep 60
nfcburner burn -s 48656c6c6f21deadbeef --seed-only  # seed only, keep settings and clock
nfcburner config --step 60                          # settings + clock, no seed (unrestricted models)
nfcburner config --step 60 --clear-seed             # same on a restricted model (clears the seed)
nfcburner bulk --random-seed --out tokens.csv --format entra [--count 50]
nfcburner bulk --random-seed --algo sha256 --out tokens.json --format graph
nfcburner bulk --random-seed --out tokens.xml --format authpoint   # also writes tokens.bin
nfcburner totp -b JBSWY3DPEHPK3PXP                  # current code for a seed, no reader needed
Commands
| Command | What it does |
|---|---|
readers | Lists the readers and whether a card is on each. |
info | Shows the token's model, serial number, clock and drift. |
burn | Writes a seed. Writes the settings and clock first unless you add --seed-only. |
config | Writes the settings and sets the clock without a new seed. On restricted models, needs --clear-seed. |
bulk | Burns every token placed on the reader, one after another, until Ctrl+C or --count. |
totp | Prints the current code for a seed. Works offline. |
legacy | Runs with the options of the earlier token2_config.py tool. |
Options
| Option | Meaning |
|---|---|
-s, --seed | Seed in hex (up to 63 bytes) |
-b, --seed-base32 | Seed in Base32 |
-u, --uri | otpauth://totp/ link; also sets algorithm and time step unless given |
-q, --qr image | Read the seed from a QR code image; --qr-pick N chooses the account in an export QR code |
--random-seed [bytes] | New random seed (20 bytes for SHA1, 32 for SHA256 by default) |
-a, --algo | sha1 (default) or sha256 |
-e, --step | 30 (default) or 60 seconds |
-p, --sleep | Display turns off after 15, 30 (default), 60 or 120 seconds |
-t, --time | UTC UNIX time for the token clock; 0 or omitted means now |
--out file, --format | Bulk export file and format: entra (default), graph, authpoint, duo, generic |
-r, --reader | Reader to use (name or part of it); also the NFCBURNER_READER environment variable |
-w, --wait | Seconds to wait for a token (default 15) |
-v, --verbose | Print every command exchanged with the token |
--json | Machine-readable output |
Exit codes
The same as token2_config.py: 0 OK, 1 invalid input, 2 no reader, 3 no token or no response, 4 authentication failed, 5 settings rejected, 6 seed rejected, 7 unknown serial prefix.
macOS command line
The command-line tool nfcburner is inside the app. After dragging Token2 NFC Burner to Applications, open Terminal and run:
sudo ln -sf "/Applications/Token2 NFC Burner.app/Contents/MacOS/nfcburner" /usr/local/bin/nfcburnerThen nfcburner works from any folder, for example nfcburner readers.
Existing scripts
Calls written for token2_config.py keep working; the original options are recognised automatically:
nfcburner --seed JBSWY3DPEHPK3PXPJBSWY3DPEHPK3PXP --time 0 --step 1 --algo 1 --sleep 2
nfcburner --seed 48656c6c6f21deadbeef48656c6c6f21deadbeef --hex true
In this form, --step 1/2 means 30/60 s, --algo 1/2 means SHA1/SHA256, and --sleep 1–4 means 15/30/60/120 s.