
TOTPRadius - Cisco Meraki Client VPN
Meraki Client VPN with two-factor authentication and self-enrolment of the second factor
Meraki Client VPN does not natively support two-factor authentication, a third-party solution is required for this configuration. Starting from v0.2.1 TOTPRadius can serve as an LDAP proxy, a feature that allows implementing two-factor authentication with the systems that do not natively support it.Self-enrollment
Different from Citrix StoreFront, Meraki CVPN does not have any standard way of calling the REST API of TOTPRadius appliance. However, it is still possible to implement self-enrollment with Meraki CVPN by using VPN Connection entries prepared with Microsoft Connection Manager Administration Kit (CMAK). Detailed instructions can be found here.
TOTPRadius configuration
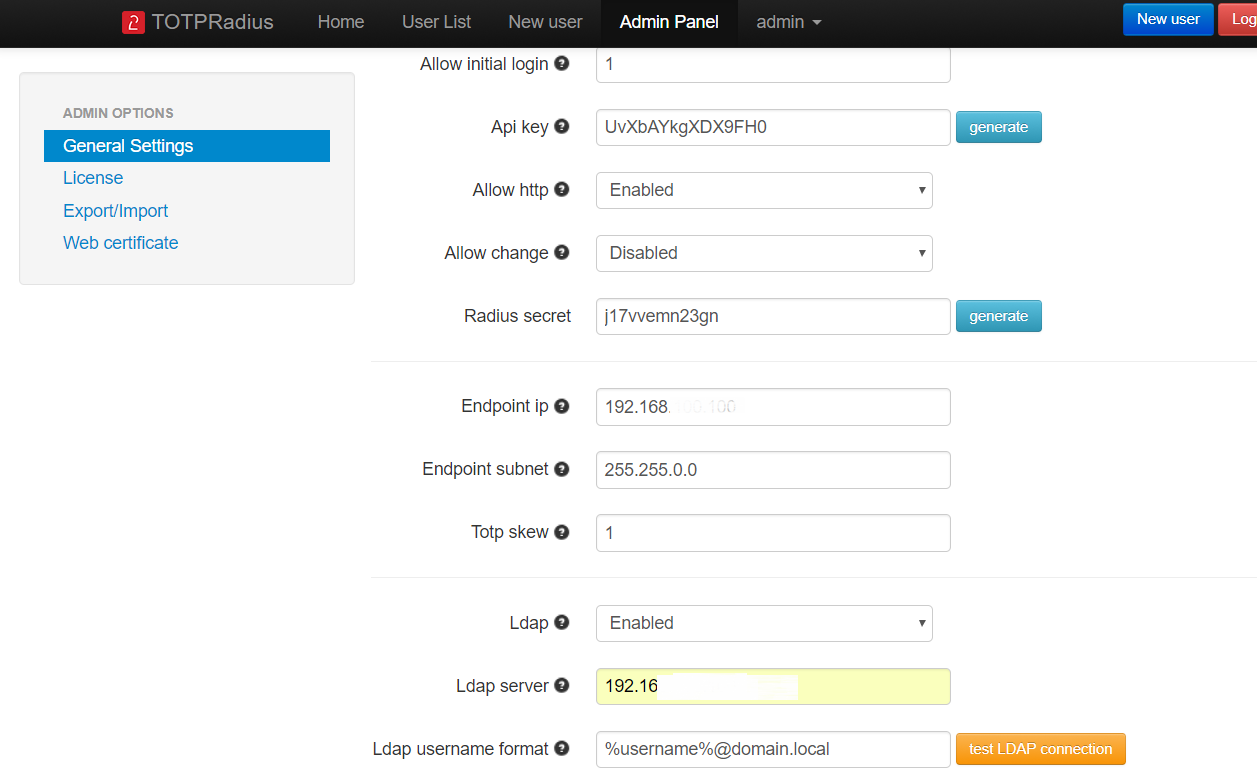
Once the TOTPRadius appliance has been installed and initialized, configure the following settings on the General settings page:
► Set or generate a new Radius secret
► In the Endpoint IP and subnet fields specify the parameters of your Meraki MX device
► Set LDAP as enabled
► Specify the LDAP server IP/FQDN and the format of the username (%username%@domain.local or DOMAIN\%username% format, where "DOMAIN" or "domain.local" need to be replaced with the domain name or removed if needed )
► If you decide to allow self-enrollment, make sure "Allow ldap enrollment" parameter is enabled. In the same section you can also allow re-enrollment and modify the intro text of the LDAP web enrollment page.
Dashboard Configuration
Once the TOTPRadius appliance has been configured , the following steps outline how to configure Client VPN to use TOTPRadius:
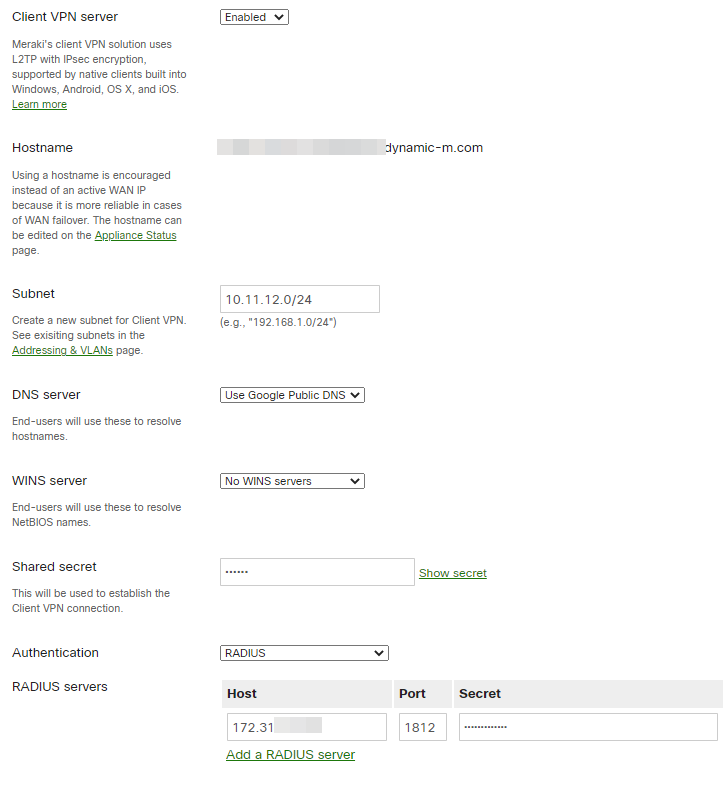
► Log onto the Cisco Meraki Dashboard and navigate to Configure > Client VPN.
► Select the option to enable the Client VPN Sever.
► Set the Client VPN Subnet. This will be a unique IP subnet offered to clients connecting to the MX Security Appliance via a Client VPN connection.
► Specify the DNS servers.
► Enter a shared secret that will be used by the client devices to establish the VPN connection. Note: This is a different value from the RADIUS shared secret.
► Select RADIUS as the Authentication method.
► Click the Add a RADIUS Server link.
► Enter your TOTPRadius IP Address.
► Enter the RADIUS Port that the MX Security Appliance will use to communicate to the NPS server. For TOTPRadius integration keep the port as 1812.
► Enter the RADIUS Shared Secret (established when the MX was added as an authenticator).
► Click Save changes.
Client Configuration
Installation of additional software is not required on client devices. The Cisco Meraki Client VPN solution uses L2TP over IPsec, which is supported by almost all device's built-in native clients. Refer to Meraki Client VPN documentation for client configuration instructions.
However, the standard methods of creating Client VPN connection entries for Meraki are not supporting self-enrollment feature. To create VPN Connection entries, refer to our CMAK guide.About
Installation and configuration
- Installation and initial configuration
- Network configuration
- Migrating from older versions
- LDAP Configuration
- Azure AD Configuration
- Self-service enrollment portal
- Web and LDAPS Certificates
- Syslog configuration
- Single-factor authentication exceptions
- Slave appliance mode
- Dynamic RADIUS Attributes
Integration guides
Blog
14-07-2026
token2-fido-bridge: NFC and smartcard FIDO2 devices on Linux
 Linux does not allow using non-USB transport for FIDO2 natively. We're happy to announce token2-fido-bridge, a small open-source tool that finally lets browsers on Linux use FIDO2 credentials stored on NFC and contact smartcards for WebAuthn.
28-06-2026
Libre Key Companion: manufacturer-agnostic security key manager for Android and iOS
 We're happy to announce Libre Key Companion, a new open-source companion application for Android and iOS that lets you manage hardware security keys and smart cards from any manufacturer.
17-06-2026
An open-source, cross-platform way to manage your Token2 keys: Companion App - Rust edition
 Token2 Companion - Rust edition - an open-source, cross-platform desktop tool for managing Token2 keys, and keys from other vendors too. It runs on Windows, macOS, and Linux, and the whole thing is open source: you can read it, audit it, build it, and extend it.